Using DeepLabCut via OnDemand
DeepLabCut is a toolbox for markerless pose estimation of animals performing various tasks. Using DeepLabCut on Apocrita via OnDemand allows you to run a GUI interface. Please refer to the overview section for instructions on how to login to OnDemand.
Starting a DeepLabCut session
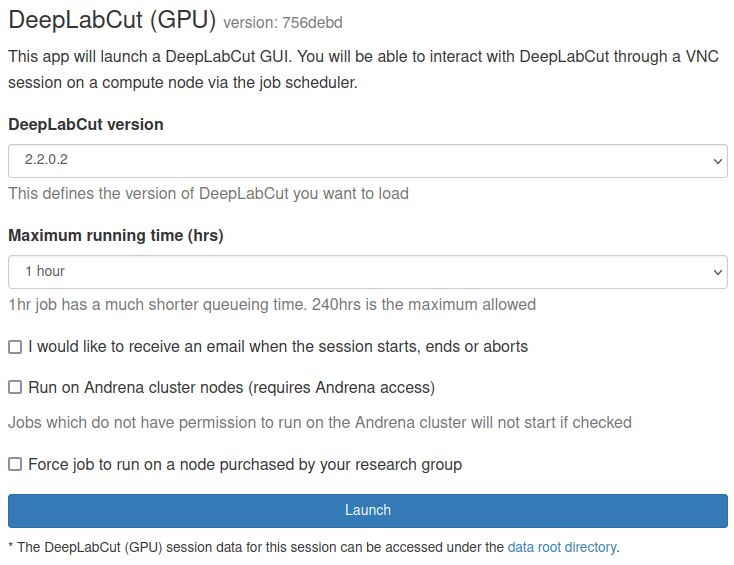
Select DeepLabCut (GPU) from the GUIs list of the Interactive Apps drop-down menu, or from the My Interactive Sessions page. Before using DeepLabCut, researchers need to request access to the GPU nodes, or have access to the DERI/Andrena GPU nodes.
Choose the resources your job will need. Choosing a 1 hour maximum running time is the best option for getting a session quickly, unless you have access to owned nodes which may offer sessions immediately for up to 240hrs if resources are available.
DeepLabCut only uses one GPU
DeepLabCut only uses one GPU therefore, the form options "number of cores" and "number of GPUs" have been removed from the OnDemand application. All DeepLabCut OnDemand jobs will be submitted with 1 GPU.
Once clicking Launch, the request will be queued, and when resources have been allocated, you will be presented with the option to connect to the session by clicking on the blue Launch DeepLabCut button.
Once connected, the familiar DeepLabCut interface is presented, and you will be able to use the allocated resources, and access your research data located on Apocrita.
GUI initialisation time
Due to the large number of dependencies being loaded to present the DeepLabCut GUI, the application may not be immediately displayed. Please allow up to 5 minutes for the GUI to be loaded before contacting us for assistance.

Exiting the session
If a session exceeds the requested running time, it will be killed. You can finish your session using one of the following methods:
- clicking [x] in the upper right corner of the DeepLabCut application
- clicking the red Delete button for the relevant session on the My Interactive Sessions page.
After a session ends, the resources will be returned to the cluster queues.
Using DeepLabCut inside Jupyter Notebook
DeepLabCut only works on GPU nodes
Do not use the Jupyter Notebook (CPU) OnDemand application with DeepLabCut. Attempting to use this version for DeepLabCut training will result in a Python error.
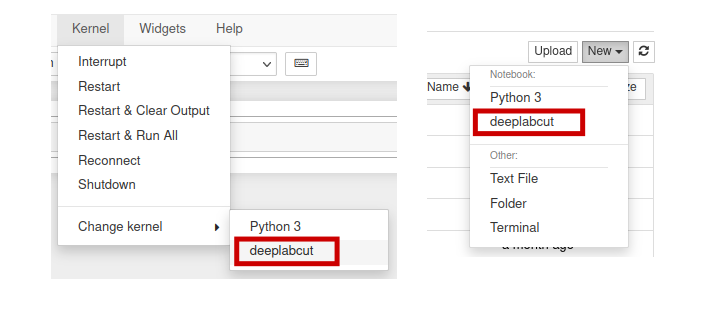
By default, the conda environment with DeepLabCut installed inside is not available within Jupyter Notebook. To enable this functionality, simply run the following commands:
module load deeplabcut
python -m ipykernel install --user --name deeplabcut
You only need to run these commands once. After initial setup, the environment
will remain available within Jupyter Notebook, and you do not need to load a
deeplabcut module to use the environment.
Now if you open a new Jupyter Notebook (GPU) session from OnDemand, you will
notice that the new deeplabcut conda environment is available under the
Kernel -> Change Kernel menu, with the name deeplabcut. Similarly, it
will be available as an option under the File -> New notebook menu.
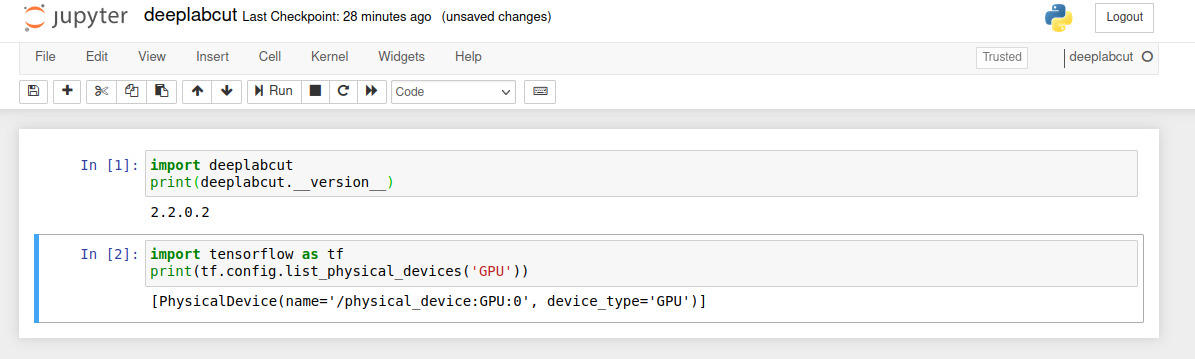
Here is an example notebook importing the deeplabcut environment, printing
the version and also the assigned GPU device:
When you have finished your analysis on Jupyter Notebook, please remember to delete your job by clicking the red Delete button within the OnDemand appliance to return the requested resources to the cluster queues.