Moving data around
You will likely need to move files around the cluster, and also copy data on/off the cluster.
Moving data around the cluster
Recommendation
rsync is the recommended way to move your data to another location on the cluster.
The mv command is fine for moving a single file. Once you start dealing with
directories, or multiple files, we recommend rsync. The primary reason for
this is that sometimes a procedure to move files may fail before completion -
loss of network connection, storage quota exceeded, etc. - leaving your dataset
in an undesirable state where some of the files have been moved, and others are
still in the original location.
The safest way to bulk move files is to copy, check, then finally delete. If
the task fails, you can safely repeat the process. This can be performed
efficiently using rsync.
Rsync
Rsync is a fast and versatile file copying tool, with a delta-transfer algorithm, which reduces the amount of data sent over the network by sending only the differences between the source files and the existing files in the destination - it is not only useful for copying sets of files to a new location, but also comparing a source and destination fileset and only copying the updated files.
The --remove-source-files option will even delete the original files,
effectively performing the same action as mv, albeit in a safer way, because
it can be restarted in case of interruption.
Basic examples of moving data around the cluster
No compression is required when moving files around locally.
# Copy a directory to another location on the cluster
rsync -av /data/home/abc123/source /data/example/destination

# Move a directory, using the copy, compare and delete method
rsync -av --remove-source-files /data/home/abc123/source /data/example/destination
Copying data to/from the cluster
This can be achieved using various methods, including rsync and Globus.
Using rsync
Examples of copying data to/from the cluster with rsync
These examples employ the -z compression option, and the optional --partial
option which makes resumption of interrupted transfers quicker when dealing
with large files. If you are on a high bandwidth connection, you may not
require compression, since the data transfer speed may be constrained by the
time taken to compress the data.
The following examples assume that the username is called abc123. You will
want to replace that with your own username.
These commands need to be run from the local machine, not on the cluster
# Copy a local directory called local_dir to your cluster home directory
rsync -avz --partial local_dir abc123@login.hpc.qmul.ac.uk:

# Copy the contents of a local directory to your cluster home directory
# Note that this will only copy what is inside local_dir.
rsync -avz --partial local_dir/ abc123@login.hpc.qmul.ac.uk:

# Copy a local directory to a specific directory on the cluster
# If the location is not in your home directory you need to specify the whole path
rsync -avz --partial example_local_dir/ abc123@login.hpc.qmul.ac.uk:/data/example/directory

# Copy a directory from the cluster to the current working directory on your local machine.
rsync -avz --partial abc123@login.hpc.qmul.ac.uk:remote_directory .
If you are not using ssh-agent, an additional option is required:
# Replace "/path/to/private_key" with the real path to your private ssh key
rsync -avz --partial \
      -e "ssh -i /path/to/private_key" \
      example_local_dir abc123@login.hpc.qmul.ac.uk:
Some rsync options include:
-a, --archive               archive mode; equals -rlptgoD (no -H,-A,-X)
    -r, --recursive             recurse into directories
    -l, --links                 copy symlinks as symlinks
    -p, --perms                 preserve permissions
    -t, --times                 preserve modification times
    -g, --group                 preserve group
    -o, --owner                 preserve owner (super-user only)
--partial                   keep partially transferred files
-v, --verbose               increase verbosity
-z, --compress              compress file data during the transfer
Note that rsync provides lots of other useful features that aren't covered here.
Dry run
Sometimes an rsync command line can get complicated, using -n or --dry-run
will allow you to test what your command will attempt to do, without actually
affecting any data.
Example job
Long-running transfers from Apocrita to another remote server (i.e. a Tier 2 cluster) should be run as a job e.g.
#!/bin/bash
#SBATCH -n 1              # Request 1 core
#SBATCH -p compute        # Request the compute partition
#SBATCH -t 1:0:0          # Request 1 hour runtime
#SBATCH --mem-per-cpu=1G  # Request 1GB RAM per core

rsync -av <source> <destination>
Data transfers between a local machine and Apocrita cannot be submitted as a cluster job - please follow an alternative method published on this page.
Globus
You can also use Globus to move data onto and off the cluster. This is particularly useful when external collaborators are involved, since they will not require an Apocrita account.
Using SCP
SCP (secure copy) can be used to copy individual files over ssh, although unlike rsync, resuming of file copying is not supported. If your connection is interrupted, you will have to repeat the upload.
Change the username from abc123 to your username in these examples.
# Copy a file to your home directory on the cluster
scp example_file abc123@login.hpc.qmul.ac.uk:

# Copy a file to a specific directory on the cluster e.g. scratch
scp example_file abc123@login.hpc.qmul.ac.uk:/gpfs/scratch/abc123/

# Copy whole directory to the home directory on the cluster
scp -r example_directory abc123@login.hpc.qmul.ac.uk:
If you are not using ssh-agent, an additional option is required:
# Replace "/path/to/private_key" with the real path to your private ssh key
scp -i /path/to/private_key example_file abc123@login.hpc.qmul.ac.uk:
Using SFTP
SFTP (Secure File Transfer) can be used to interactively transfer files over ssh.
Command line
$ sftp abc123@login.hpc.qmul.ac.uk
sftp> ls
example_remote_file1  example_remote_file_2
sftp> lls
example_local_file1  example_local_file_2
sftp> get example_remote_file1
Fetching /data/home/abc123/example_remote_file1 to example_remote_file1
sftp> put example_local_file1
Uploading example_local_file1 to /data/home/abc123/example_local_file1
Further commands are available via the help command or the man pages.
GUI - FileZilla
For a GUI on Windows, Mac OS or Linux we suggest FileZilla.
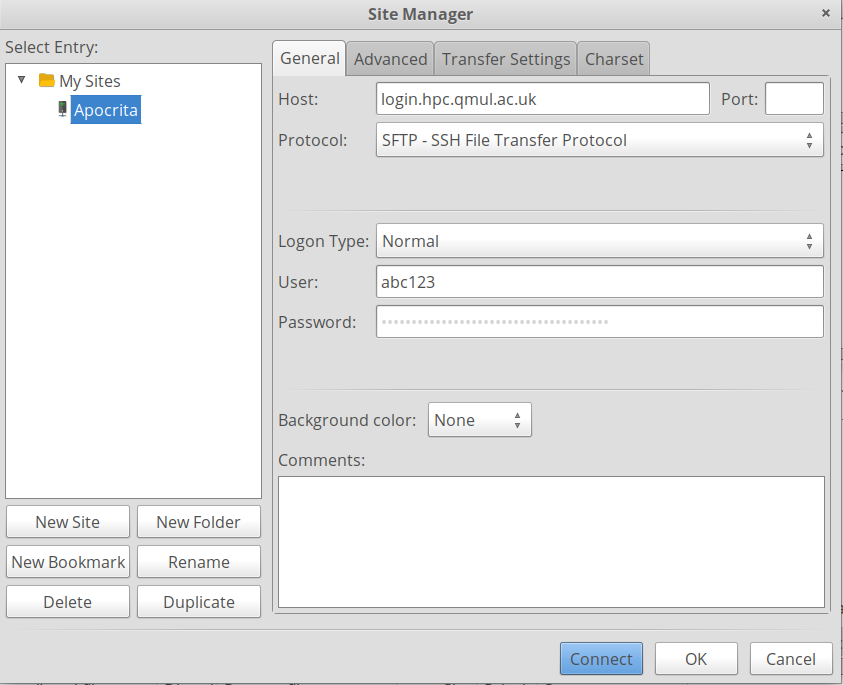
Adding a site connection
To connect to the cluster:
- From the
Filemenu open theSite Manager. - Click the
New Sitebutton and name the connectionApocrita. - In the
Hostbox enterlogin.hpc.qmul.ac.uk. - Set the
ProtocoltoSFTP. - Set the
Logon TypetoNormal - Enter your Apocrita username in the
Userfield e.g.abc123. - Enter your Apocrita login password in the
Passwordfield.
Importing a private key into FileZilla
Your private key can be presented via the SSH agent, or you can import the key into FileZilla:
- Click
Edit, thenSettings. - In the
Connectionsection, clickSFTP. - Click
Add key file...to import an existing private key into FileZilla. - Browse to the relevant OpenSSH private key.
- Select
Yeswhen asked if you would like to convert it into a supported format. - Provide a filename for the converted key file e.g.
filezilla-apocrita-key.ppk, then clickSaveto import it.

Finally, you can return to the Site Manager and click Connect on the Apocrita
site you created.
FileZilla security
If you ask FileZilla to save passwords for you, it is recommended that you
protect passwords with a master password. This can be found under Edit->
Settings -> Interface.
Adding bookmarks to commonly used folders
You can optionally set up bookmarks under the Apocrita site, to jump to specific folders, such as scratch, or shared storage:
- From the
Filemenu open theSite Manager. - Select the Apocrita site.
- Press the
New Bookmarkbutton. - Give the bookmark an appropriate name (e.g.
YOURSHARE-NAME). - Enter the path to the desired folder in the
Remote Directorybox e.g./data/YOURSHARE-NAME.
Selecting the bookmark and clicking Connect will open the folder.
Using Mobaxterm on Windows
Mobaxterm can use rsync or the gui to download/upload files.
Mobaxterm - RSYNC
Mobaxterm is bundled with a command-line rsync tool that functions identically to the one described above. Be sure to use full paths as you may experience issues with mobaxterm incorrectly interpreting shortcuts.
# On QMUL-managed computers /drives/g should point to your Windows home folder.
rsync -avz abc123@login.hpc.qmul.ac.uk:/data/home/example /drives/g
Mobaxterm - GUI
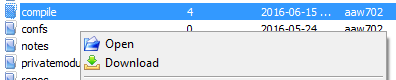
Login to Apocrita as per Logging in. The left
sidebar should then display a list of files on the remote server.
Files can be downloaded by right clicking and selecting 'Download'.
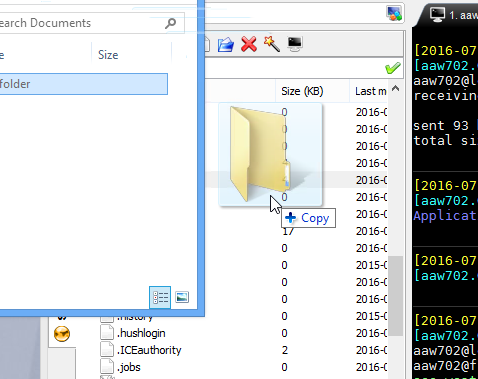
Files can be uploaded by clicking the upload button
![]() at the top of
the sidebar.
at the top of
the sidebar.
Alternatively files can be drag-and-dropped from file explorer.
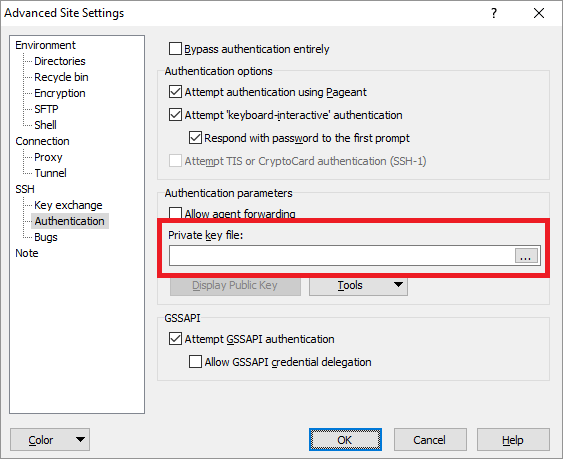
Using WinSCP on Windows
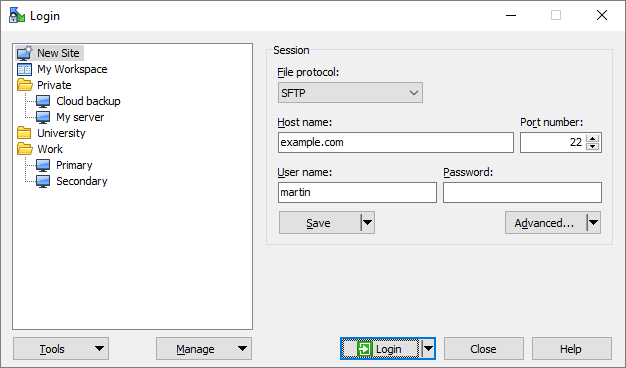
Adding a site connection to WinSCP
After launching WinSCP, the connection manager window will appear. Enter the following details to connect to Apocrita:
- Set the
File protocoltoSFTP. - In the
Host namebox enterlogin.hpc.qmul.ac.uk. - Enter your Apocrita username in the
User namefield e.g.abc123. - Enter your Apocrita login password in the
Passwordfield. - Click on the
Advanced...button, thenAuthenticationunder theSSHbranch in the left navigation tree. - Click the
...button in thePrivate key filefield and choose your private SSH key. - Click on the
OKbutton, followed by theSavebutton to save your session.
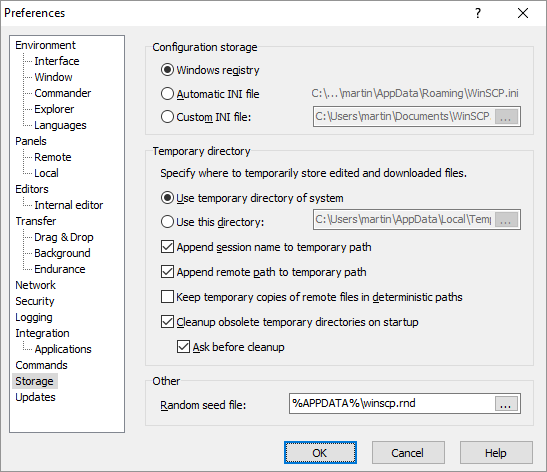
Saving settings in a non-standard directory
On QMUL managed computers, you may face a permissions issue when saving your
settings, if the WinSCP installation directory is not writable by
non-administrator accounts. To save your settings in a non-standard directory,
change the path to the INI file, following the below instructions:
- From the main WinSCP window, click on
Optionsin the menu bar and choosePreferences. - In the left navigation tree, choose
Storage. - In
Configuration storage, select theCustom INI fileoption and enter a path that is writable for your user account (alternatively select a location using the...browser).
Aspera - ASCP
Aspera's ascp is a high-speed file transfer application, commonly used
for the download of genome data and other large datasets.
To load the ascp binary into your PATH, run command: module load aspera.
Usage: ascp [OPTION] SRC... DEST
          SRC to DEST, or multiple SRC to DEST dir
          SRC, DEST format: [[user@]host:]PATH
Transfer rate limit
By default, ascp will utilise all available bandwidth, and impact
other cluster users. To avoid this, please set the max transfer
rate to 300Mbit/s by passing the -l 300M switch.