Using GPUs
Some nodes on Apocrita contain GPU cards that can provide huge acceleration for certain types of parallel computing tasks, via the CUDA and OpenCL frameworks.
Access to GPU nodes
Access to GPU nodes is available for free to QM Researchers. Please
test your job
on the gpushort partition and check that the GPU is being used, then
contact us to request access to
the required partition(s) in order to use the GPU nodes fully.
Note that access to GPU nodes is not permitted for Undergraduate and MSc
students, or external users.
Short partition GPU testing
QM Researchers should test their GPU code on the 1-hour gpushort partition
before requesting full GPU node access for the first time. Please provide
supporting evidence of a working GPU job (a job id, or screenshot of
nvidia-smi output) when requesting node access - see below for more
information and examples.
Test jobs must demonstrate genuine research value. Submissions consisting solely of benchmarking scripts or those designed to game allocation metrics will not be accepted. All test jobs must actively utilise the GPU for a minimum of 20 minutes to demonstrate meaningful workload engagement.
Applications with GPU support
There are a
considerable number of
scientific and analytical applications with GPU support. While some have GPU
support out of the box, such as Matlab and
Ansys, others may require specific GPU-ready
builds. These may appear in the module avail list with a -gpu suffix. If
you require GPU support adding to a specific application, please
submit a request for a GPU build and provide some test
data.
Be aware that not every GPU-capable application will run faster on a GPU. For example, an application may only have specific subroutines that offer GPU acceleration - code that is not GPU aware will instead run on the CPU.
Submitting jobs to GPU nodes
Different nodes contain different GPUs, CPUs and RAM
Please check the nodes you are entitled to run jobs on for their specifications and tailor your job scripts accordingly. Some nodes are limited to specific faculties/users.
To request a GPU, the --gres=gpu:<count> option should be used in your job
submission. Jobs should request an appropriate number of cores per GPU
(--cpus-per-gpu=<count>) and RAM per core (--mem-per-cpu=<count>) to ensure
the number of cores and RAM requested is proportionate to the number of GPUs
requested (please see the examples
below). The scheduler will automatically select a GPU node based on availability
and other resource parameters, if specified.
For users with access to nodes that have 48 cores or more, you may request up to
16 cores per GPU to better utilise the available resources. To request 16 cores
per GPU, please alter your --cpus-per-gpu and --mem-per-cpu requests
accordingly (eligible GPU high memory jobs may request up to 20G RAM per core)
and ensure your job defines to correct partition(s)/constraint(s), e.g.:
-p sae(Science and Engineering partition, authorised users only)--constraint=hopperrequest only nodes containing Hopper H100/H200 cards
We have also added most GPU node types to the gpushort partition which may be
used before acquiring access to run longer GPU jobs.
Selecting a specific GPU type
For compatibility, you may optionally require a specific GPU type. Nodes with
the Ampere A100 GPU may be selected with --constraint=ampere,
and Hopper H100/H200 nodes may be selected with --constraint=hopper. To see a
full list of constraints for specific nodes, run:
scontrol show node <hostname> | grep Features
For example, for xdg1:
$ scontrol show node xdg1 | grep Features
   AvailableFeatures=hopper,h100,sm_90,80G
   ActiveFeatures=hopper,h100,sm_90,80G
You can request multiple features/constraints using various combinations. Please see the official Slurm documentation for more information.
GPU card allocation
Do not set the $CUDA_VISIBLE_DEVICES variable manually
For reasons documented below, please do not set the $CUDA_VISIBLE_DEVICES
variable manually in your job scripts.
We have enabled GPU device cgroups (Linux Control Groups) across all GPU nodes on Apocrita, which means your job will only be presented the GPU cards which have been allocated by the scheduler, to prevent some applications from attaching to GPUs which have not been allocated to the job.
Inside your job, the GPU cards presented to your job will always appear as device 0 to device N, depending on how many GPU cards you have requested. Below demonstrates the devices presented to jobs, per GPU resources request:
| GPUs Requested | Devices Presented |
|---|---|
| 1 | 0 |
| 2 | 0, 1 |
| 3 | 0 - 2 |
| 4 | 0 - 3 |
Slurm will automatically export the CUDA_VISIBLE_DEVICES variable to your
assigned GPU card(s) within your job.
Checking GPU usage
SSH access is only permitted when running a job on a node
We have enabled the pam_slurm_adopt module on all Apocrita compute nodes. You will only be granted SSH access to a node if you have a currently running job or session on that node, and all commands run will be limited to (and share) the same resources requested for that session.
The monitoring tools below need to be run directly on the nodes allocated to
your jobs. You will need to login directly to the node from an existing login
node session via SSH (e.g. ssh sbg5 - if prompted for a password, use your
standard Apocrita password).
Errors such as:
-bash: nvidia-smi: command not found
indicate that you are either still on the login node, or logged into a node that does not have any GPUs.
You can establish which nodes have been allocated to your jobs using the
squeue command, or by
referring to the Open OnDemand card for your jobs shown in the
"My Interactive Sessions" section.
Checking GPU usage with nvidia-smi
GPU usage can be checked with the nvidia-smi command e.g.:
$ nvidia-smi -l 1
|-------------------------------+----------------------+----------------------+
| GPU  Name        Persistence-M| Bus-Id        Disp.A | Volatile Uncorr. ECC |
| Fan  Temp  Perf  Pwr:Usage/Cap|         Memory-Usage | GPU-Util  Compute M. |
|                               |                      |               MIG M. |
|===============================+======================+======================|
|   0  Tesla V100-PCIE...  On   | 00000000:06:00.0 Off |                    0 |
| N/A   70C    P0   223W / 250W |  12921MiB / 16160MiB |     97%      Default |
|                               |                      |                  N/A |
+-------------------------------+----------------------+----------------------+

+-----------------------------------------------------------------------------+
| Processes:                                                                  |
|  GPU   GI   CI        PID   Type   Process name                  GPU Memory |
|        ID   ID                                                   Usage      |
|=============================================================================|
|    0   N/A  N/A      1557      C   python                          12915MiB |
+-----------------------------------------------------------------------------+
In this example we can see that the process is using GPU 0, which may not be
the system GPU device 0. You will only see the GPU(s) allocated to your job,
as the SSH session will attach to the running job. The -l 1 option shown
above instructs nvidia-smi to repeatedly output the status.
The $SLURM_JOB_GPUS environment variable reports the real system GPU device
number. Whilst it is unlikely that users will need to know this, it's useful
to ITS Research when debugging jobs.
Checking GPU usage with gpu-usage
Another tool to check your GPU job is gpu-usage:
$ gpu-usage
--------------------
Hostname: sbg5
Wed 27 May 14:27:06 BST 2026
Used GPUs: 3 of 4
--------------------
GPU0: User: abc123 Process: gmx Utilisation: 53%
GPU1: User: bcd234 Process: python Utilisation: 78%
GPU2: Not in use.
GPU3: Not in use.

User: abc123 JobID: 2345677 GPU Allocation: 1 Partition: gpu
User: bcd234 JobID: 2345678 GPU Allocation: 1 Partition: gpu
User: cde345 JobID: 2345679 GPU Allocation: 1 Partition: gpu
Warning! GPUs requested but not used!
In this example, we can see that two jobs (2345677 and 2345678) are correctly
using the GPUs. The third job (2345679) from user cde345 has requested a
GPU but is not using it.
Checking GPU usage with nvtop and nvitop
Two other tools to check your GPU job are nvtop and nvitop. They are both
available after loading the nvtools module:
module load nvtools
To run nvtop:
nvtop
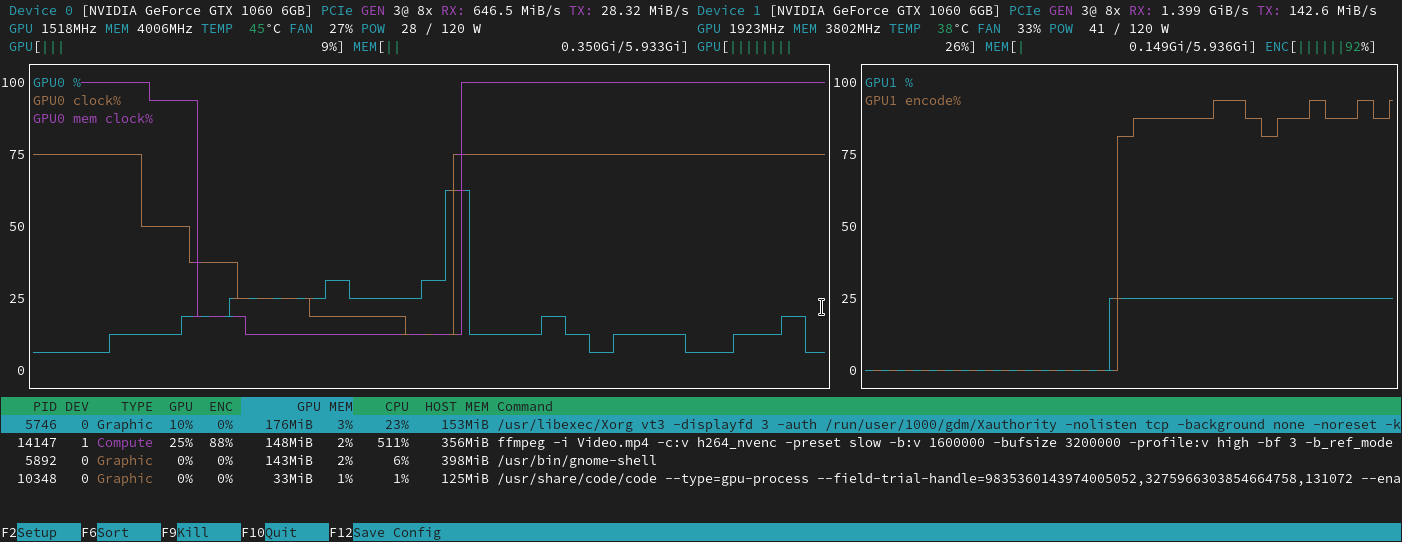
nvtop provides a colourised view of GPU activity on a node, in a similar
layout to the popular htop system monitor. More information can be found in
its
documentation.
To run nvitop:
nvitop
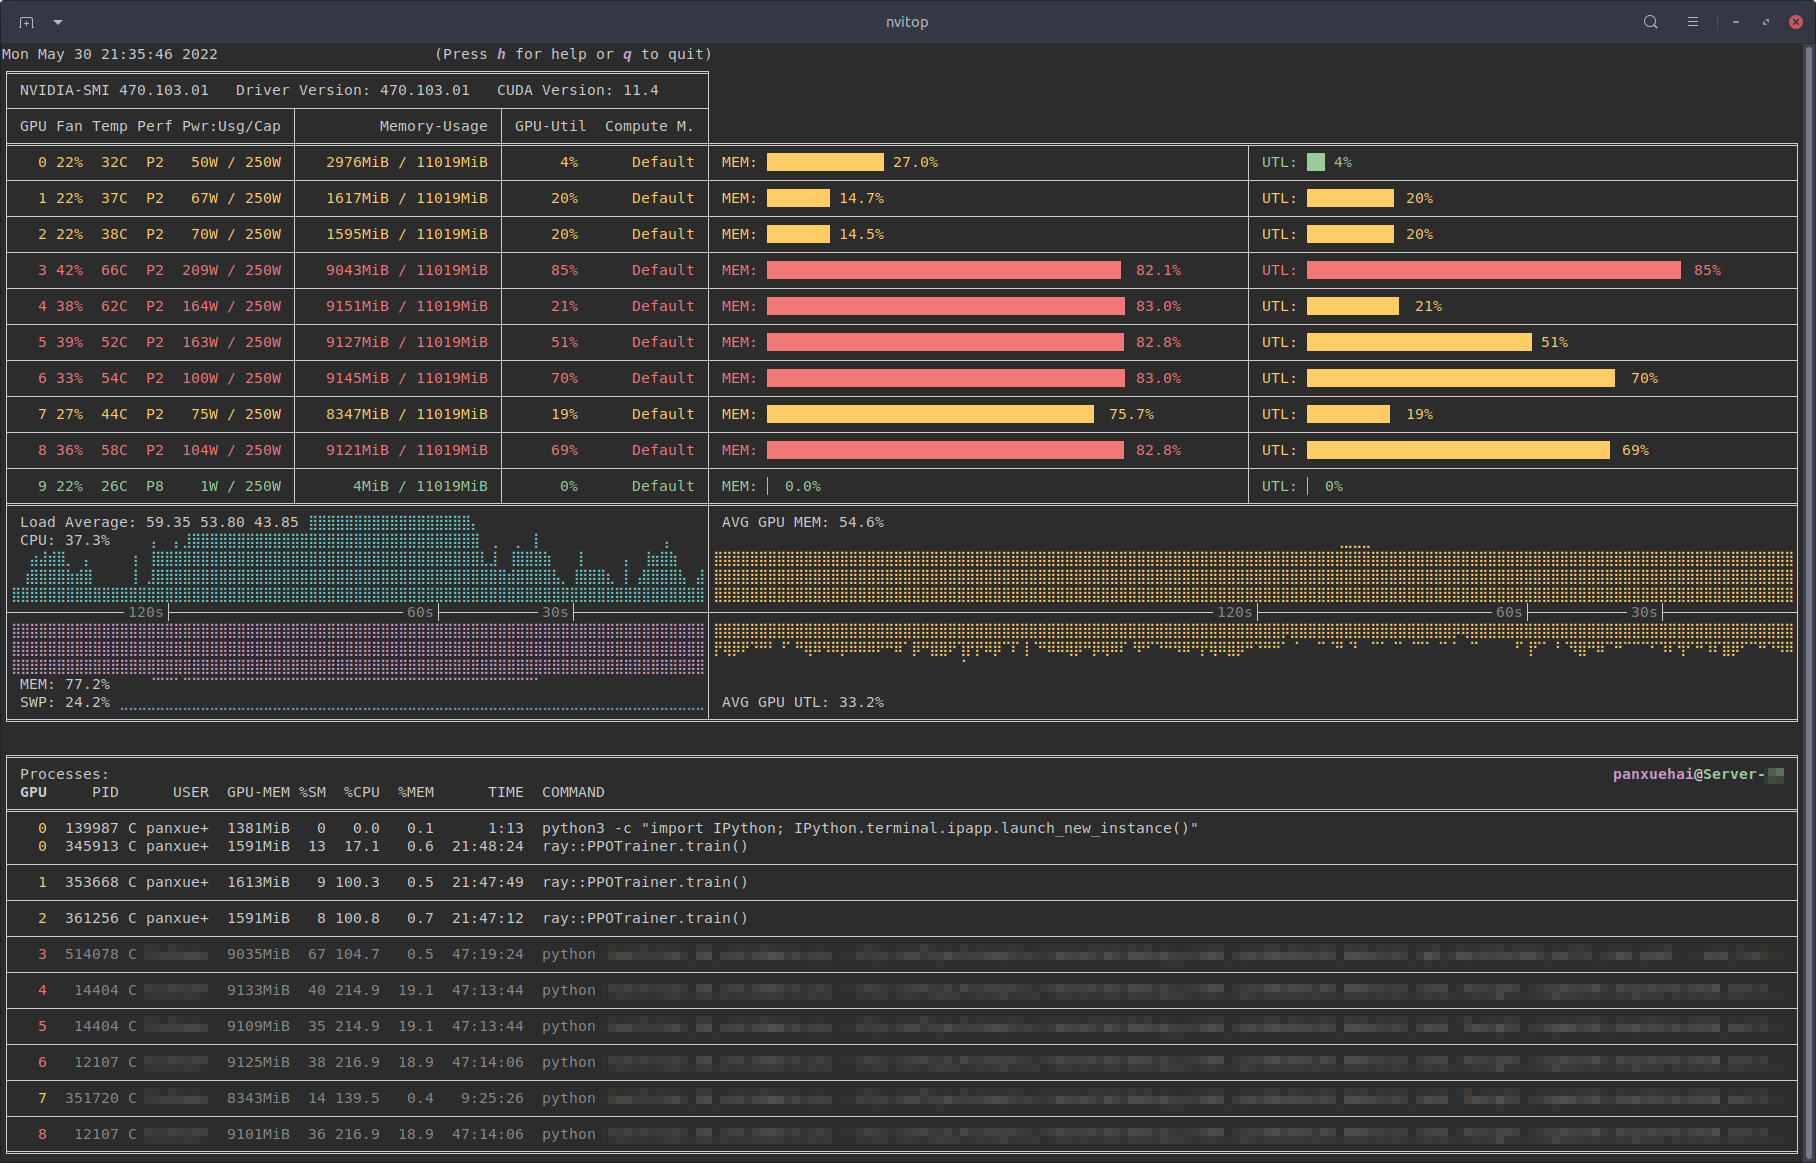
nvitop also provides a colourised view of GPU activity on a node, with a
slightly alternative layout compared with nvtop. Press h for help or q to
return to the terminal. nvitop has a lot
of powerful options which can be explored in its
documentation.
Example job submissions
The following examples show the basic outline of job scripts for GPU nodes. Whilst the general rule for compute nodes is to strictly request only the cores and RAM you will be using, our GPU jobs are GPU-centric, so requests should focus around the number of GPUs required.
For simplicity, GPU jobs must request at least 8 cores per GPU, and should request at least 11GB RAM per core, as shown in our examples below and other documentation pages (for example TensorFlow). Whilst it is possible for some users to request up to 16 cores per GPU by requesting extra resources, we have not provided a generic example for that here. Please refer to other documentation pages on this site for more information.
--mem-per-cpu does not need to account for GPU RAM
The --mem-per-cpu request only refers to the system RAM, and does not need
to account for GPU RAM used. The full GPU RAM is automatically granted when
you request a GPU.
Request an explicit number of --cpus-per-gpu
Whilst we set minimal defaults for all GPU partitions, you should always
request a specific number of CPUs (-n) and also a specific number of
CPUs per GPU (--cpus-per-gpu). This becomes important when requesting
larger core counts and more cores per GPU (up to 16), otherwise your job may
be rejected by Slurm.
Requesting exclusive access
Requesting exclusive access on the GPU nodes will block other GPU jobs from starting. Please only request exclusive access if also requesting the maximum number of GPUs available in a single GPU node and your code supports multiple GPUs.
Short Partition Testing
Request one short partition GPU
#!/bin/bash
#SBATCH -J jobname
#SBATCH -o %x.o%j            # single STDOUT/STDERR output file jobname.o<job number>
#SBATCH -p gpushort          # request gpushort partition
#SBATCH -n 8                 # 8 cores
#SBATCH --cpus-per-gpu=8     # 8 cores per GPU
#SBATCH -t 1:0:0             # 1 hour runtime (required to run on the short partition)
#SBATCH --mem-per-cpu=11G    # 11 * 8 = 88G total system RAM
#SBATCH --gres=gpu:1         # request 1 GPU of any type

./run_code.sh
Request two short partition GPUs
#!/bin/bash
#SBATCH -J jobname
#SBATCH -o %x.o%j            # single STDOUT/STDERR output file jobname.o<job number>
#SBATCH -p gpushort          # request gpushort partition
#SBATCH -n 16                # 16 cores
#SBATCH --cpus-per-gpu=8     # 8 cores per GPU
#SBATCH -t 1:0:0             # 1 hour runtime (required to run on the short partition)
#SBATCH --mem-per-cpu=11G    # 11 * 16 = 176G total RAM
#SBATCH --gres=gpu:2         # request 2 GPUs of any type

./run_code.sh
Request four short partition GPUs (whole node)
Request --exclusive and --mem-per-cpu
On Slurm, the --exclusive flag does not include RAM. You must also
explicitly request RAM on the node using --mem-per-cpu. Do not use
--mem=0 as this will fail on GPU nodes. Check that the total amount of RAM
requested is appropriate for the nodes in the partition you submit
the job to.
#!/bin/bash
#SBATCH -J jobname
#SBATCH -o %x.o%j            # single STDOUT/STDERR output file jobname.o<job number>
#SBATCH -p gpushort          # request gpushort partition
#SBATCH -n 32                # 32 cores
#SBATCH --cpus-per-gpu=8     # 8 cores per GPU
#SBATCH -t 1:0:0             # 1 hour runtime (required to run on the short partition)
#SBATCH --mem-per-cpu=11G    # 11 * 32 = 352G total RAM
#SBATCH --gres=gpu:4         # request 4 GPUs of any type
#SBATCH --exclusive          # request exclusive access

./run_code.sh
Production GPU Nodes
Specify partitions
Once you have approved GPU access, please add the specific partition(s) you
wish your job to be submitted to, as detailed below. Note, you can request
multiple partitions (in order of preference) separated by a comma, e.g.
-p andrena,sae would request Andrena and Science and Engineering nodes. At
the time of job submission, if there were free GPUs on Andrena nodes, the
job would run on them, otherwise they would fall back to S&E nodes.
Request one GPU
#!/bin/bash
#SBATCH -J jobname
#SBATCH -o %x.o%j            # single STDOUT/STDERR output file jobname.o<job number>
#SBATCH -p gpu               # request the gpu partition
#SBATCH -n 8                 # 8 cores
#SBATCH --cpus-per-gpu=8     # 8 cores per GPU
#SBATCH -t 240:0:0           # 240 hours runtime
#SBATCH --mem-per-cpu=11G    # 11 * 8 = 88G total system RAM
#SBATCH --gres=gpu:1         # request 1 GPU of any type

./run_code.sh
Request two GPUs
#!/bin/bash
#SBATCH -J jobname
#SBATCH -o %x.o%j            # single STDOUT/STDERR output file jobname.o<job number>
#SBATCH -p gpu               # request the gpu partition
#SBATCH -n 16                # 16 cores
#SBATCH --cpus-per-gpu=8     # 8 cores per GPU
#SBATCH -t 240:0:0           # 240 hours runtime
#SBATCH --mem-per-cpu=11G    # 11 * 16 = 176G total RAM
#SBATCH --gres=gpu:2         # request 2 GPUs of any type

./run_code.sh
Request four GPUs (whole node)
Request --exclusive and --mem-per-cpu
On Slurm, the --exclusive flag does not include RAM. You must also
explicitly request RAM on the node using --mem-per-cpu. Do not use
--mem=0 as this will fail on GPU nodes. Check that the total amount of RAM
requested is appropriate for the nodes in the partition you submit
the job to.
#!/bin/bash
#SBATCH -J jobname
#SBATCH -o %x.o%j            # single STDOUT/STDERR output file jobname.o<job number>
#SBATCH -p gpu               # request the gpu partition
#SBATCH -n 32                # 32 cores
#SBATCH --cpus-per-gpu=8     # 8 cores per GPU
#SBATCH -t 240:0:0           # 240 hours runtime
#SBATCH --mem-per-cpu=11G    # 11 * 32 = 352G total RAM
#SBATCH --gres=gpu:4         # request 4 GPUs of any type
#SBATCH --exclusive          # request exclusive access

./run_code.sh
If you are requesting all GPUs on a node, then choosing exclusive mode will give you access to all of the resources. Note that requesting a whole node will likely result in a long queueing time.
Getting help
If you are unsure about how to configure your GPU jobs, please contact us for assistance.