Logging in
Overview
To login to Apocrita for the first time, you need to:
- Request a login account.
- Create an SSH key pair.
- Upload your public key.
- Use SSH to connect to
login.hpc.qmul.ac.uk, using your user account, password and private key.
Additional detail is provided below.
SSH access via the Terminal
Once you have an account, you can log into the cluster from any network (internal to QMUL, over eduroam, or from other sites over the internet) using a secure shell (SSH).
To login into Apocrita using your password and SSH key, use one of the following methods (valid for all Linux, macOS and Windows 10+ systems).
- SSH connection with a specific key.
- Add the key to your SSH agent (optional).
- Create an SSH configuration file (optional).
Firstly, open a local terminal or the Windows Command Prompt.
- On Linux systems, this will usually be an application called "Terminal".
- On macOS systems, go to
Applications->Utilities->Terminal. - On Windows 10+, type cmd (short for command) into the search box, and press Enter. You may need to firstly enable the OpenSSH client if SSH commands do not work by default.
Then connect using one of the above methods, further described below. In all
examples, replace USERNAME with your Apocrita username and
/path/to/privatekey with the real path to your generated private key. If you
have not already generated a key pair, see the
instructions to generate a SSH key pair.
SSH connection with a specific key
Run the following command to SSH into Apocrita specifying a private key.
ssh -i /path/to/privatekey USERNAME@login.hpc.qmul.ac.uk
- On Linux the key path defaults to
/home/USER/.ssh/id_ed25519. - On macOS the key defaults to
/Users/USER/.ssh/id_ed25519. - On Windows 10+ the key defaults to
C:\Users\USER\.ssh\id_ed25519
Where USER is the username on your local machine.
Additional security policy measures in force
Please note that we apply a policy of requiring your user account password in addition to your password-protected SSH key to login to Apocrita.
Your password will not be displayed
Linux does not display feedback as passwords are typed.
Never share your private key or password with anyone
Your private key / password identifies you as yourself, anyone with either of these can access the cluster using your account.
Add the key to your SSH agent
Run the following commands to add the private key to your SSH agent and log in to Apocrita.
ssh-add /path/to/privatekey
ssh USERNAME@login.hpc.qmul.ac.uk
By using the SSH agent, you will not be prompted for the key passphrase every time you use the key once the key has been added to the agent. A key will remain in the agent until either removed, the agent is restarted or your machine is rebooted.
The SSH agent might be disabled by default on Windows 10+, to enable this, open the Services window, right click on the OpenSSH Authentication Agent entry and press Start. If this option is not available, click Properties and change the Startup Type to "Automatic", then start the service.
Create an SSH configuration file
In the .ssh directory, create a file called config and include
the following:
Host apocrita
  Hostname login.hpc.qmul.ac.uk
  User USERNAME
  IdentityFile /path/to/privatekey
Now you can SSH to Apocrita using the following command:
ssh apocrita
As you have stored your username, remote hostname and private key information inside the SSH user configuration file, you do not need to specify these on the command line.
Please also see our step-by-step video tutorial which demonstrates the process of creating SSH keys, and logging in to the QMUL Apocrita HPC cluster for Linux / MacOS users.
Windows Subsystem for Linux (WSL)
Windows 10 and 11 now offer a Linux environment called Windows Subsystem for Linux (WSL). WSL 2 is recommended over WSL 1 where possible - you can compare versions here.
You can install WSL on Windows by opening a Windows Terminal or Powershell window as an administrator and issuing:
wsl --install
This command will enable the required optional components, download the latest Linux kernel, set WSL 2 as your default, and install a Linux distribution for you (Ubuntu by default).
You can check which version of WSL is installed using:
wsl -l -v
which will output something like:
  NAME      STATE           VERSION
* Ubuntu    Stopped         2
To start using WSL, simply open a Windows Terminal or Powershell window and issue:
wsl
More in-depth installation documentation is available from Microsoft.
SSH keys under WSL
For creating a new SSH key inside WSL, please follow the instructions for Linux that you will find here.
If you have created SSH keys on Windows using the Windows terminal, they will
be stored in c:\Users\<username>\.ssh. However, you can't use SSH keys stored
in this directory directly from WSL as the permissions aren't strict enough and
you will receive an error message:
@@@@@@@@@@@@@@@@@@@@@@@@@@@@@@@@@@@@@@@@@@@@@@@@@@@@@@@@@@@
@         WARNING: UNPROTECTED PRIVATE KEY FILE!          @
@@@@@@@@@@@@@@@@@@@@@@@@@@@@@@@@@@@@@@@@@@@@@@@@@@@@@@@@@@@
Permissions 0755 for '/home/user/.ssh/id_ed25519' are too open.
It is required that your private key files are NOT accessible by others.
This private key will be ignored.
Load key "/home/user/.ssh/id_ed25519": bad permissions
abc123@login.hpc.qmul.ac.uk: Permission denied (publickey).
Instead, you will need to copy your keys into the WSL environment - run the following from within WSL:
cp -r /mnt/c/Users/<username>/.ssh/* ~/.ssh
and then set the correct permissions:
chmod -R 600 ~/.ssh/*
SSH key permissions
All files in ~/.ssh need to have 0600 permissions, so repeat the
process above if you copy any new/additional keys or config files into it.
For further information, please see here.
MobaXterm setup instructions (Windows only)
MobaXterm is only supported on Windows operating systems
If you are using Linux or macOS, please see the SSH access via the Terminal instructions above.
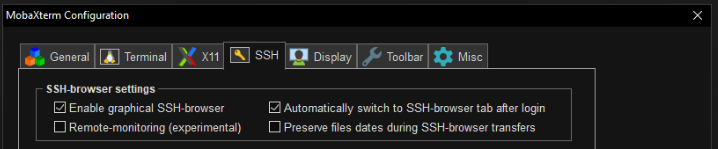
Do not use Remote Monitoring
When using MobaXterm, please do not activate the
"Remote-monitoring (experimental)" feature under
Settings -> Configuration -> SSH:
Also, do not check the "Remote monitoring" box in your currently running session:

Please use the documented methods for monitoring instead.
Users may find WSL a better option than MobaXterm, as it is supported directly by Microsoft and part of Windows. The instructions below are for legacy users or those that prefer to use MobaXterm.
If you require a graphical SFTP connection and X Windows support, then you can use MobaXterm. The following instructions explain how to create a session to log into Apocrita.
- Open MobaXterm.
- Click on the Session tab above the Quick connect textbox. This will bring up a new window.
- Click SSH (first option) to display the SSH settings.
- Enter login.hpc.qmul.ac.uk in the Remote host box.
- Check the Specify username box and enter your Apocrita username into the textbox.
- Click the Advanced SSH settings tab to display further options.
- Check the Use private key box, click the page icon at the right of the textbox and browse to your private key.
- Click OK to save your session. This will also attempt a connection to Apocrita.
When logging in, you should be asked for your SSH key passphrase, then your Apocrita password. You may click Yes when prompted to save your Apocrita password securely so you do not need to type this every time you login.
Please also see our step-by-step video tutorial which demonstrates the process of creating SSH keys, and logging in to the QMUL Apocrita HPC cluster for Windows users.
Changing your password
Once you have an ITS Research account, you should be able to change your password from the automatically generated one.
The password change will affect access to the following ITS Research services:
- Apocrita HPC cluster
- GitHub Enterprise (research version)
To change your ITS Research account password, firstly log into Apocrita using
your existing password and run the passwd command to set a new password. When
choosing a new password, please ensure it meets the following requirements:
- 9 or more characters in length
- a combination of uppercase letters, lowercase letters, numbers (and symbols)
- non-dictionary words which are easy to guess
- different from your previous Apocrita password(s)
If you cannot remember your password please contact us to request a password reset.
QMUL users wanting to change their centralised QMUL account password should visit the Self Service Password Reset site rather than following the above instructions.